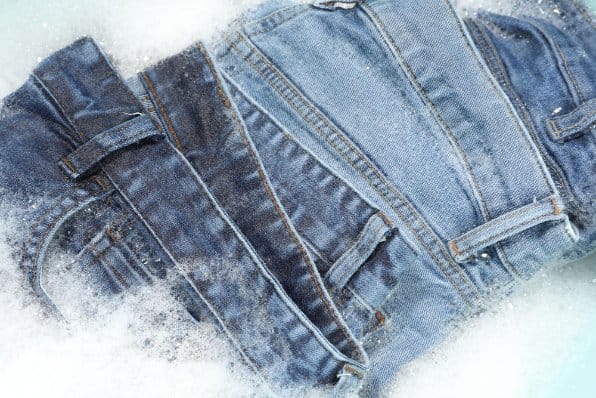
That high-contrast, mottled look on acid wash denim did not require a factory. It required pumice stones, bleach, and a dry drum. The home version works on the same basic principle: you protect some areas of fabric from bleach and expose others, and the contrast between them creates the pattern.
The acid wash revival of 2026 has pushed this technique back into the DIY mainstream. People are finding old jeans they stopped wearing, thrift store denim jackets for almost nothing, and plain denim shorts that could become something worth keeping. Acid washing at home is one of the most accessible fabric projects you can do. It costs very little, requires no special equipment, and produces a genuinely unique result every time.
This guide covers five techniques in increasing order of complexity, from the classic scrunch and spray that any beginner can manage, to the pumice stone method that most closely mimics what a factory does. Each technique produces a different kind of result, and knowing which to choose before you start makes all the difference.
Before anything else, we start with safety. Bleach is a powerful oxidising chemical that can cause real harm if handled carelessly. The safety section is short. Please read it before you open a bottle.
New to denim in general? Our complete acid wash denim guide gives you a solid foundation, and our dedicated washed denim fabric guide explains the full range of finishing techniques used in the industry.
Safety: Non-Negotiable Rules
Household bleach (sodium hypochlorite) causes chemical burns on skin and serious eye damage on contact. The fumes irritate the lungs. None of this makes it something to be afraid of if you handle it sensibly, but a few precautions are genuinely important.

Never mix bleach with ammonia, vinegar, rubbing alcohol, or any other cleaning product. These combinations create toxic gases including chloramine and chlorine. Check labels before using anything near your bleach solution. Work in a space with real airflow, not just a cracked window.
- Wear nitrile or rubber gloves throughout. Bleach causes chemical burns. Even brief skin contact with concentrated bleach causes irritation. Do not remove gloves until you have finished and sealed the bottle.
- Protect your eyes. Safety glasses or goggles are strongly recommended. Spray bottles can misfire and bleach in the eyes is a medical emergency.
- Work outdoors or with strong ventilation. A garden, driveway, or balcony is ideal. If working indoors, open all windows and use a fan to draw air out.
- Wear old clothes. Bleach will permanently mark any fabric it touches. Assume whatever you are wearing will be ruined.
- Keep children and pets away. Not just during the process but until all surfaces and tools have been rinsed clean.
- Always dilute bleach with water. Never use bleach at full concentration on fabric. See the concentration guide below.
- Have cold water ready to hand. If bleach contacts your skin or eyes, rinse immediately with large amounts of cold water for at least 15 minutes and seek medical attention if irritation persists.
- Test a small hidden area first. The inside of a waistband or hem tells you how the specific fabric and colour react before you commit to the full piece.
What You Need
Most of what you need is likely already in your home or available cheaply. Here is the full list divided into required items and optional extras depending on which technique you choose.

Required for All Techniques
Standard sodium hypochlorite. Around 3 to 6% concentration is typical for household products.
For diluting bleach and rinsing the fabric thoroughly after treatment.
Full coverage is important. Kitchen gloves work. Thin disposable gloves are not suitable.
Safety glasses or goggles. Standard reading glasses do not protect from splashes.
For mixing bleach solution. Never use metal containers as bleach reacts with some metals.
Old towels or plastic sheeting to protect surfaces from bleach drips.
A clean plastic spray bottle for applying diluted bleach. Label it clearly after use.
Essential for scrunching, tying, and creating pattern resists. Have plenty available.
Optional but Useful
For neutralising bleach after rinsing. More reliable than rinsing alone. Available from pharmacies.
Alternative neutraliser. Dissolve in cold water to create a neutralising soak.
For Technique 5, the factory-style method. Available from beauty suppliers or online.
For precision work. Does not run like liquid bleach, giving much more control.
For Technique 4 (targeted stencil). Plastic stencils work best.
For applying bleach precisely. Use brushes you do not mind ruining.
For holding accordion-folded fabric in place during Technique 3.
Applied to areas you want to protect, such as seams or pocket edges.
Choosing the Right Fabric
The fabric you choose has more influence over the final result than anything else. Get this right and the rest of the process is far more forgiving.

What Works Best
100% cotton denim is the gold standard. Cotton absorbs the bleaching agent readily and releases indigo dye in a controlled way, giving you that sharp, high-contrast result. The heavier the denim, the more dramatic the contrast. A 12 oz jacket produces stronger contrast than a lightweight 8 oz pair of jeans.
Raw denim is an excellent candidate if you have a pair. The dye sits close to the surface on untreated denim, which means the bleach lifts it quickly and the contrast is sharp and clean.
What to Be Cautious With
Stretch denim containing elastane or spandex can be acid washed, but the stretch fibres are more sensitive to bleach. Use a more diluted solution, keep exposure time shorter, and test carefully beforehand. The cotton component will bleach normally but overexposure can affect the stretch quality.
Cotton-rich blends with 70 to 85% cotton will work but may produce less dramatic results than 100% cotton. Blends with significant synthetic content, over 30% polyester, will not respond reliably. Bleach does not strip synthetic dyes the same way it does indigo on cotton.
Fabric Colour and What to Expect
Dark or mid-indigo denim gives you the most room for contrast. The bleach removes the surface dye and reveals the lighter base colour beneath, creating that classic light-and-dark mottled pattern.
Black denim bleaches differently. The dye base is often a very dark red, brown, or navy. When bleached, black denim typically goes to a reddish-orange or rusty brown tone rather than the blue-white contrast of indigo denim. This can be striking when done deliberately. Test a hidden area first so you know what to expect.
A pair of dark indigo jeans you have stopped wearing, or a medium-weight denim jacket from a charity shop. These give you the best fabric for dramatic results at low cost, and with no emotional attachment to the outcome. If something goes wrong, it does not matter. If it goes right, you have a unique piece you will want to wear.
Bleach Concentration Guide
The ratio of bleach to water is one of the most important variables you control. More bleach means faster, lighter results with less control. Less bleach means slower, more subtle effects and more time to intervene.
| Ratio (Bleach:Water) | Effect Speed | Visual Result | Best For | Caution |
|---|---|---|---|---|
| 1:5 (very diluted) | Slow (45-90 min) | Subtle fade, soft contrast | Light denim, first experiments | Low |
| 1:3 (light) | Moderate (30-45 min) | Gentle fade, visible contrast | Mid-weight denim, beginners | Low |
| 1:2 (medium) | Moderate (15-30 min) | Classic acid wash contrast | Most denim types – recommended start | Moderate |
| 1:1 (strong) | Fast (10-20 min) | Bold, high-contrast, dramatic fade | Dark indigo, heavy denim jackets | Moderate |
| Near-undiluted | Very fast (5-10 min) | Extreme bleaching, near-white | Advanced spot treatments only | High |
The Five Techniques
This is the foundational technique and produces the most recognisable acid wash pattern. Scrunching the fabric creates areas of contact and resistance, and the contrast between them is what gives acid wash its character. Every scrunch is different, which is why every result is unique.
What you get: Random, cloud-like mottled patches with variable contrast. The classic acid wash look.
- Pre-wash the denim without fabric softener and leave it damp for more even absorption. For sharper, more dramatic contrast, work with completely dry fabric instead.
- Lay the denim flat and randomly scrunch sections, working from one end to the other. The tighter and more irregular the scrunching, the more defined the final pattern. Secure each section with a rubber band as you go.
- Continue until the whole garment is scrunched into a compact, irregular bundle. Flip it over and add rubber bands to any loose areas on the back.
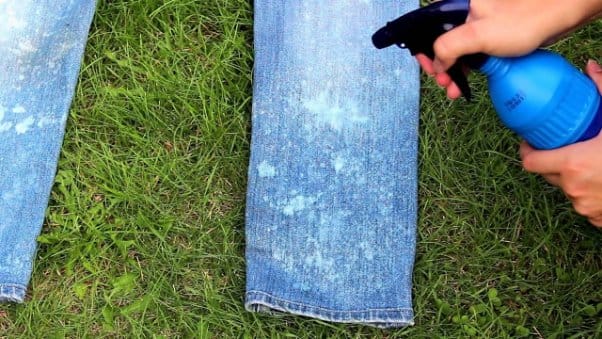
- Mix your bleach solution in a plastic bucket, starting with 1:2 bleach to water. Fill your spray bottle from the bucket.
- Place the bundle on your protected outdoor surface. Spray the solution across the raised outer surfaces. Be generous on the areas you want light but avoid saturating the whole bundle, as bleach will wick into the darker inner areas and reduce contrast.
- Leave to work and check every five minutes. The outer surfaces will lighten visibly within 10 to 20 minutes depending on concentration and fabric weight.
- When you reach the contrast you want, move immediately to the neutralising and rinsing step. Do not delay.
- Remove the rubber bands after thoroughly rinsing. Machine wash alone in cold water with mild detergent. Air dry.
This technique borrows from tie-dye and gives you more control over where the bleaching happens. Instead of spraying the whole garment, you partially submerge sections in a bleach solution. The result has more defined zones of light and dark, often with a gradient at the boundaries where wet meets dry fabric.
What you get: More structured contrast zones. Circular or spiral patterns. Good for a gradient from dark to light across the garment.
- Twist the garment into a spiral shape, starting from the centre and turning outward. Secure the spiral with rubber bands at intervals so it holds its shape throughout treatment.
- Alternatively, for distinct zones rather than spirals, fold the garment into a flat bundle and secure at regular intervals with rubber bands.
- Mix a bleach solution (1:1) in a wide, shallow plastic tub. Make enough to submerge sections of the bundle.
- Partially dip the bundle into the solution. Hold or prop it so only part is submerged. The submerged areas bleach while the dry areas stay dark.
- After 10 to 15 minutes, lift the bundle, rotate it, and dip a different section. This layering creates overlapping zones of contrast.
- When the result looks right, remove immediately and rinse under cold running water, then neutralise as described below.
This technique produces a more graphic, linear result than scrunching. Instead of random cloud-like patches, you get distinct stripes or bands running across the fabric. It is a more directional, contemporary look that works particularly well on denim jackets and wide-leg trousers.
What you get: Clean linear stripes of alternating dark and light. More geometric and intentional than the scrunch method. Highly controllable width and spacing.
- Lay the denim flat and fold it accordion-style, as you would fold paper to put in an envelope. Keep each fold even and the same width, roughly 5 to 8 cm depending on how wide you want the stripes.
- Once the whole garment is folded into a flat, layered stack, secure it firmly with binder clips or thick rubber bands at each end. The stack should not spring open during treatment.
- Mix your bleach solution (1:2 or 1:1 depending on desired intensity) in your spray bottle.
- Spray the outer exposed edges of the folded stack. The bleach penetrates the outermost layers on each side but not the inner layers, which stay dark.
- Let it work for 15 to 25 minutes, checking regularly. The outer edges lighten fastest.
- Rinse immediately, neutralise, carefully unfold, and wash alone in cold water. Air dry flat to avoid stretching while wet.
Variations: Fold diagonally across the garment for diagonal stripes. Fold in a fan shape from a single corner for a radiating starburst pattern.
This technique gives you the most control over where and how bleach is applied. Using stencils, painter’s tape, or resist materials like petroleum jelly, you can create specific shapes, logos, botanical patterns, or graphic elements on the denim surface. This sits closer to a fine craft project than the other techniques.
What you get: Defined, repeatable shapes and patterns. High creative control. Results look very designed and intentional rather than random.
- Lay the denim flat on your protected surface. If you want to protect specific areas such as seams, pockets, or edges, apply painter’s tape or a thin layer of petroleum jelly. The jelly creates a resist that bleach cannot penetrate.
- Position your stencil on the fabric and hold or tape it flat. Plastic stencils work better than paper ones, as paper can absorb bleach and bleed at the edges.
- Use gel or thickened bleach for precision. Liquid bleach spreads and runs. Gel stays where you apply it. Work with a paintbrush or sponge from the stencil edges inward to prevent bleed beneath the stencil border.
- Remove the stencil carefully after 5 to 10 minutes. Lift straight up rather than dragging across the fabric.
- Reposition the stencil on an adjacent area and repeat as desired. Allow each application to work before overlapping treatments.
- Once satisfied with the overall design, rinse thoroughly, neutralise, and machine wash alone in cold water.
Ideas to try: Geometric shapes, botanical outlines, lettering, abstract patches on pockets or shoulders. Painter’s tape in grid patterns works well for creating graphic stripe effects on jacket back panels.
This is the home version of what happens inside a factory. Rather than spraying bleach onto fabric, you soak pumice stones in a bleach solution and rub them directly against dry denim. The stones transfer the chemical only where they make physical contact, creating the localised, sharp-edged patches that define industrial acid wash most closely.
What you get: The most authentic factory-style acid wash effect. High contrast at contact points, deep indigo retained where the stone did not reach. More labour-intensive but the most distinctive and authentic result.
- Soak pumice stones in a 1:1 bleach solution for 30 minutes in a sealed plastic bag or lidded plastic container. The stones should be fully saturated with the solution.
- Remove the stones and drain the excess solution back into the container. The stones should be moist but not dripping heavily onto the fabric during application.
- Lay the denim flat on your protected outdoor surface. Work with the fabric completely dry for the sharpest contrast results.
- Rub the soaked stones directly against the fabric surface with firm, even pressure. Focus on areas that would show the most wear on a real garment: thighs, knees, the seat of jeans, elbows on a jacket, shoulders and chest.
- The stones leave lighter areas wherever they make contact. Varied pressure naturally creates the irregular patterns typical of acid wash. Re-soak the stones in the bleach solution if they begin to dry out before you finish.
- Leave the fabric for 10 to 15 minutes after finishing the stone work to allow the bleach to continue developing.
- Rinse thoroughly with cold water, neutralise, and machine wash alone. Air dry.
Safety note: This technique requires more direct handling of bleach-saturated objects. Ensure gloves are thick enough and eye protection is firmly in place throughout. Work where stone dust and bleach solution can be rinsed away safely afterwards.
How to Neutralise Properly
Neutralising the bleach is not optional. Leaving residual bleach in the fabric causes it to continue weakening the fibres after washing, which leads to premature breakdown and pinholes at stress points over time.
Complete DIY acid wash process from preparation to finished garment.
Watch: How to Acid Wash and Lighten Black Denim Jeans

A practical walkthrough showing how to acid wash and lighten black denim jeans at home, including technique tips and outfit results.
Your Two Neutralising Options
Hydrogen peroxide (3% solution): The most reliable option. After rinsing out the bleach thoroughly with cold water, prepare a fresh bucket of cold water and add a generous splash of hydrogen peroxide. Soak the denim for 5 to 10 minutes, then rinse again. Hydrogen peroxide chemically neutralises residual sodium hypochlorite and stops any ongoing bleaching action in the fabric.
Baking soda solution: Dissolve two to three tablespoons of baking soda in a bucket of cold water. After rinsing out the bleach, soak the denim for 5 to 10 minutes, then rinse once more. Baking soda is alkaline and counteracts the conditions created by bleach.
Mixing bleach residue with vinegar produces chlorine gas. If you ever use vinegar for any laundry purpose, ensure the fabric has been fully machine washed and dried and all bleach has been removed before vinegar comes anywhere near it. Never use both in the same bucket or at the same session.
“Stop the process the moment you see the colour you want. You cannot reverse over-bleaching, but you can always go further in a second session if the result needs more contrast.”
Troubleshooting Common Problems
Things do not always go exactly to plan the first time. Here is how to handle the most common issues that come up.
Project Ideas and Upcycling
Acid washing is one of the most effective ways to rescue denim you have stopped wearing and give it a completely different life. It also works brilliantly on thrift store and charity shop finds.

Secondhand denim is ideal for DIY acid washing. It is inexpensive, it is cotton-rich, and you have no emotional attachment to the outcome. If the result is not what you wanted, you have lost very little. If it works well, you have a genuinely unique piece at almost no cost. This connects directly to the sustainability argument made in our guide to the environmental cost of denim production, where buying and upcycling existing pieces is consistently one of the most impactful choices available.
Denim has always been one of the most versatile fabrics for DIY projects. Acid washing extends the creative possibilities across many item types beyond jeans. Here are some of the best projects to consider, roughly in order of complexity:
Denim Shorts
Cut an old pair of jeans to shorts length then acid wash. The frayed hem pairs naturally with the bleached finish.
Tote Bag
Cut the legs off old jeans, sew the bottom closed, add straps. Acid wash before or after construction. Denim bags are extremely durable.
Denim Jacket
A secondhand jacket acid washed with the scrunch method is one of the most wearable and impactful DIY results. Heavy denim gives excellent contrast.
Skirt Refashion
Cut jeans along the inner seam, open out to a flat panel, sew into a skirt shape, then acid wash for a unique and wearable finish.
Patchwork Accent
Acid wash a section of denim separately, cut into patches and add to a plain jacket or bag as a contrast panel or pocket facing.
Cushion Covers
Cut from the flattest part of old jeans and acid wash for a textured, graphic home textile that is also machine washable.
Patchwork Jacket
Acid wash several denim pieces at different intensities, cut into panels, and assemble. Each panel carries a different fade level for a rich, layered result.
Custom Waistcoat
Remove the sleeves from a denim jacket, acid wash the resulting waistcoat, and finish the armhole edges by hand-stitching or controlled fraying.
Because it is so durable, even heavily worn denim that is too damaged to wear can be cut up and used for bags, patches, coasters, and home accessories. The acid wash technique makes pieces people consider unusable into items they actively want. It is a genuinely useful craft skill for anyone interested in moving away from fast fashion and towards making the most of what already exists. The look is also relevant across all ages, including in children’s denim clothing, making it one of the most universally applicable DIY skills you can develop.
Caring for Your DIY Acid Washed Piece
A DIY acid-washed garment needs a little more care than a factory-finished piece in the first few washes, because the home bleaching process is less precisely controlled. Here is how to protect the result.

After the first wash: Wash the piece alone a second time after the initial neutralising wash. Some residual bleach can remain even after thorough treatment, and a second cold machine wash removes any remaining traces before the piece is safe to wash with other garments.
Ongoing care: Always wash inside out in cold water on a gentle cycle, using a mild detergent without optical brighteners. Air dry wherever possible. Avoid prolonged direct sun exposure until the piece has been washed several times and the treatment is fully stable.
Preserving the contrast: The bleached areas are already at their lightest. It is the darker indigo areas that can continue to fade with washing. Cold water washing and infrequent laundering are your two most effective tools for keeping the contrast strong.
For a full reference covering all denim types, our denim care guide has detailed advice on washing frequency, detergent choice, and long-term storage.
The Denim Wash Frequency Calculator helps you build a personalised washing schedule that keeps your DIY pieces looking their best for longer.
Frequently Asked Questions
You can, but it requires serious ventilation. Bleach fumes irritate airways and prolonged exposure in an enclosed space is genuinely uncomfortable and potentially harmful. If you must work indoors, open all windows and exterior doors, use a fan to actively pull air out of the room, and take regular breaks in fresh air. A garden, driveway, or covered outdoor space is always the better option.
There is no fixed time. It depends on your bleach concentration, the darkness of the denim, the cotton content of the fabric, and the result you want. At a 1:2 ratio on dark indigo denim, significant change appears within 10 to 20 minutes. The key is to watch the fabric constantly and stop the process by rinsing with cold water the moment you reach the contrast level you want. Do not set a timer and walk away.
This is completely normal and not a mistake. Black denim is typically dyed with a base that contains red, brown, or navy undertones. When bleach strips the surface dye, those undertones become visible, producing rust, orange, or reddish-brown tones rather than the blue-white contrast you get with indigo denim. Always test a small hidden area on any garment before committing to the full treatment so you know exactly what result to expect.
The most reliable method: rinse the fabric under cold running water for at least two minutes, then soak in a fresh bucket of cold water with a splash of 3% hydrogen peroxide for 5 to 10 minutes, then rinse again and machine wash alone in cold water. A baking soda solution (two tablespoons dissolved in cold water) is a good alternative. Never mix bleach residue with vinegar as this produces chlorine gas.
Bleach does not strip colour from polyester fibres the same way it does from cotton, so denim with high polyester content produces weak and inconsistent results. Denim with a small elastane or spandex content (typically 1 to 3% in stretch jeans) can be acid washed with care, using a more diluted solution and shorter exposure time. Always test a hidden area first on any blended fabric.
Yes, but with care. Each bleaching session weakens fabric fibres incrementally. Always wash and fully dry the piece between sessions, and assess the result in good light before deciding whether it needs another pass. Seams and pockets are most vulnerable to fibre breakdown with repeated bleaching, so examine those areas carefully before proceeding.
Yes. Jackets respond particularly well to the scrunch method, the accordion fold technique, and the pumice stone method. Jackets tend to use heavier denim than jeans, which produces excellent contrast. The multi-layered areas around collars and cuffs will bleach more heavily than single-layer body panels, which naturally adds to the variation and character of the result.
Skin contact: remove contaminated clothing immediately and rinse the affected area with large amounts of cold running water for at least 15 minutes. If irritation or burning persists, seek medical attention. Eye contact: rinse eyes immediately with large amounts of cold water for at least 15 minutes, holding the eyelids open, and seek medical attention right away. Do not rub the eyes. Prevention through gloves and eye protection is always far easier than treatment.
Conclusion and Key Takeaways
DIY acid washing looks technically complex from the outside but is genuinely achievable once you understand the core principle: protect some areas from bleach, expose others, and the contrast between them creates the pattern. Everything else is just technique and timing.
The five methods in this guide take you from a beginner project with rubber bands and a spray bottle to an advanced technique that produces results very close to factory-grade acid wash. Start with the scrunch and spray method on a thrift store denim jacket. An hour and a few basic materials are all you need to produce something genuinely unique that you will want to wear.
Here are the most important things to take from this guide:
- Safety is the starting point, not an afterthought. Gloves, eye protection, and ventilation are required before you open any bleach.
- 100% cotton denim gives the best results. The higher the cotton content, the more dramatic and consistent the bleaching effect will be.
- Watch the fabric, not a timer. Stop the process the moment you see the result you want. You cannot undo over-bleaching.
- Neutralise thoroughly. Hydrogen peroxide after a thorough cold water rinse is the most reliable method. Never combine bleach residue with vinegar.
- Different techniques produce different results. Scrunch for random cloud patterns, accordion fold for stripes, stencil for graphic shapes, pumice stones for the most authentic factory-style effect.
- Thrift store denim is the ideal starting material. Low cost, usually good cotton content, and no emotional attachment to the outcome if things go differently than planned.
- Second sessions are possible if you need more contrast, but always wash and dry fully between passes and check the condition of seams and stress points before proceeding.
- The technique extends far beyond jeans. Jackets, shorts, bags, skirts, cushion covers, and more all work well when the base fabric is cotton-rich denim.
This is one of the most satisfying DIY skills to develop because every result is different and completely yours. No factory produced the same pattern. No one else has the same piece. That unpredictability is exactly what made acid wash denim compelling in the first place, and it is just as true when you make it yourself at home.
Working with acid wash denim as a designer or student? Our technical guide for fashion students and designers covers construction techniques, wash sequencing, pattern placement, and sourcing in depth.
Further Reading and Sources
- American Sewing Guild: How to Make Denim Look Stone- or Acid-Washed – practical DIY technique guidance with safety notes
- DiZNEW Denim Manufacturer: How to Make Acid Wash Jeans – factory vs home process comparison from a manufacturing perspective
- Textile School: Washing Techniques for Denim Jeans – technical overview of industrial denim washing processes
- Clothing Digest: Denim Care Guide – detailed care advice for all denim types after treatment