Complete Sewing Machine Maintenance Guide: Simple Steps to Keep Your Machine Running Perfectly
Your sewing machine is more than just a tool – it’s your creative partner that brings every project to life. Whether you’re learning to sew or you’re an experienced seamstress, keeping your machine in top condition makes all the difference between smooth, professional results and frustrating breakdowns.
Think of maintenance like brushing your teeth. Skip it for a few days and you’ll notice. Skip it for months and you’ll have serious problems. The good news? Taking care of your sewing machine only takes a few minutes after each project, and the payoff is huge.
Table of Contents
Why Regular Maintenance Matters More Than You Think
Every time you sew, tiny fabric fibers and dust particles sneak into your machine’s hidden corners. These innocent-looking bits of fluff team up with oil to create a sticky mess that can jam your machine faster than you’d expect.
What maintenance does a sewing machine need? Your machine needs three basic types of care: cleaning (removing lint and debris), lubrication (applying proper oil to moving parts), and regular inspections (checking for wear and timing issues). Most problems start small but grow into expensive repairs when ignored.
The good news? You don’t have to guess when or how to maintain your machine. Our maintenance schedule calculator creates a personalized care plan based on your specific sewing habits, while our problem diagnosis tool helps you quickly identify and fix issues before they become expensive repairs. Plus, you can track everything with our digital maintenance log template to optimize your care routine over time.
Here’s what happens when you stay on top of maintenance:
- Your stitches stay consistent and professional-looking
- Your machine runs quieter and smoother
- You avoid 80% of common sewing problems
- Your machine can last 20+ years instead of just 5-10
How long do sewing machines last? A well-maintained machine can easily serve you for 25-30 years or more. Many quilters still use machines from the 1970s that run like clockwork because they’ve been properly cared for.
What You’ll Need: Essential Tools and Supplies
Before diving into maintenance, let’s gather the right tools. Using the wrong supplies can actually damage your machine, so this part is crucial.
Must-Have Cleaning Tools
| Tool | Purpose | Why It Matters |
|---|---|---|
| Small nylon brush (0.3″ angled) | Removes lint from tight spaces | Won’t scratch delicate parts |
| Tweezers (angled tip) | Pulls out thread tangles | Reaches where brushes can’t |
| Microfiber cloths | Wipes surfaces clean | Lint-free and gentle |
| Cotton swabs | Detail cleaning | Perfect for precision work |
The Right Oils and Solvents
Does a sewing machine need to be oiled? Yes, absolutely. Moving metal parts need lubrication to prevent wear and keep running smoothly. But here’s the catch – only use oils specifically made for sewing machines.
Can you oil a sewing machine with WD40? Never use WD-40 on your sewing machine. It’s a penetrating oil that attracts dust and can damage plastic components. Stick to high-grade sewing machine oil like Singer All-Purpose Oil or Brother Genuine Oil.
For heavy-duty cleaning, use non-flammable, citrus-based solvents. These dissolve sticky residue without damaging your machine’s finish.
Storage and Organization
Keep everything in a small tackle box or toolbox. Store oils upright to prevent leaks, and always cap solvents tightly. A dedicated maintenance kit means you’re more likely to actually use it.
Brand-Specific Maintenance Requirements
Different brands have unique needs based on their construction and design philosophy. Here’s what you need to know for the most popular brands:
Brother Machines
Brother machines are known for their user-friendly features and affordable computerized models. Many use plastic components that require gentler care:
- Oil every 10-15 hours of use (some newer models have sealed bearings that never need oil)
- Clean lint more frequently – plastic parts can jam easier than metal
- Common sewing machine stitches may skip if tension discs get dusty
- Check your manual for automatic lubrication systems
Singer Machines
Singer offers everything from basic mechanical models to high-end computerized machines:
- How do I oil my Singer sewing machine? Locate the oil points marked in your manual (usually 5-7 spots)
- Traditional models need more frequent oiling than modern sealed-bearing machines
- Pay extra attention to the hook race area – Singer timing is sensitive to debris
Janome Machines
Known for their durability and precision, Janome machines typically feature more metal construction:
- Do baby lock machines need to be oiled? (Baby Lock is owned by Janome) Yes, most models need regular oiling
- Less frequent cleaning needed due to superior build quality
- When they do need service, it’s usually worth the investment due to their longevity
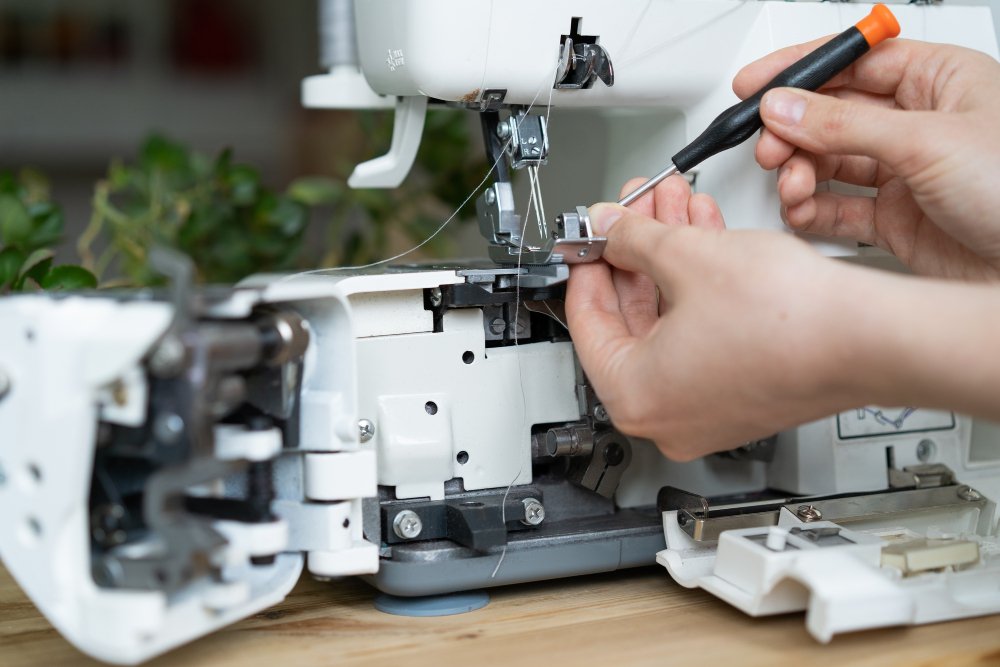
Step-by-Step Cleaning Process: The 7 Essential Steps
What are the 7 steps in cleaning the sewing machine? Here’s the complete process that professional technicians follow:
Step 1: Power Down and Prepare
Always unplug your machine first. Remove the needle, presser foot, and any thread. This prevents accidents and gives you full access to all areas.
Step 2: Remove the Needle Plate
Most machines have 1-2 screws holding the needle plate. Use the small screwdriver that came with your machine. Place screws in a small dish so they don’t roll away.
Step 3: Clean the Feed Dogs
Can I use canned air to clean my sewing machine? Yes, but use it carefully. Hold the can upright to prevent moisture spray. Blow lint away from your machine, not deeper into it. A soft brush works better for stubborn debris.
Use your angled brush to sweep lint from between the feed dog teeth. These little metal ridges move your fabric along, so keeping them clean is crucial for even stitching.
Step 4: Clean the Bobbin Area
Remove the bobbin case and brush out all lint. This is where most problems start. Look for:
- Lint wrapped around the hook
- Thread caught in tension springs
- Oil buildup that’s turned gummy
Why is the thread looping under my fabric? Usually it’s lint in the bobbin area affecting tension.
Step 5: Clean Upper Thread Path
Follow your thread path from spool to needle, cleaning each guide and tension disc. Use a cotton swab with a tiny bit of solvent for sticky spots.
Step 6: Oil Moving Parts
What parts of the sewing machine are to be lubricated? Your manual shows exactly where, but common spots include:
- Hook race (where the bobbin spins)
- Needle bar
- Presser foot bar
- Any visible metal-on-metal contact points
Apply just one drop per spot. More isn’t better – excess oil attracts lint.
Step 7: Test and Reassemble
Put everything back together in reverse order. Test on scrap fabric before starting your next project.
Advanced Troubleshooting Guide
What is the most common problem for a sewing machine? Thread bunching (also called “bird nesting”) tops the list, followed by skipped stitches and needle problems.
When problems arise, systematic diagnosis saves time and prevents making issues worse. Use our interactive problem diagnosis tool to get step-by-step solutions for your specific issue, whether it’s thread bunching, skipped stitches, or mechanical problems.
Thread Bunching Solutions
When thread tangles under your fabric:
- Re-thread completely – upper thread first, then bobbin
- Check bobbin insertion – it should spin counterclockwise when pulled
- Inspect needle condition – bent or dull needles cause 70% of thread issues
- Verify tension balance – upper and lower threads should meet in the fabric center
Why does my sewing machine keep bunching up my fabric? Usually it’s a combination of incorrect threading and wrong needle for your fabric weight.
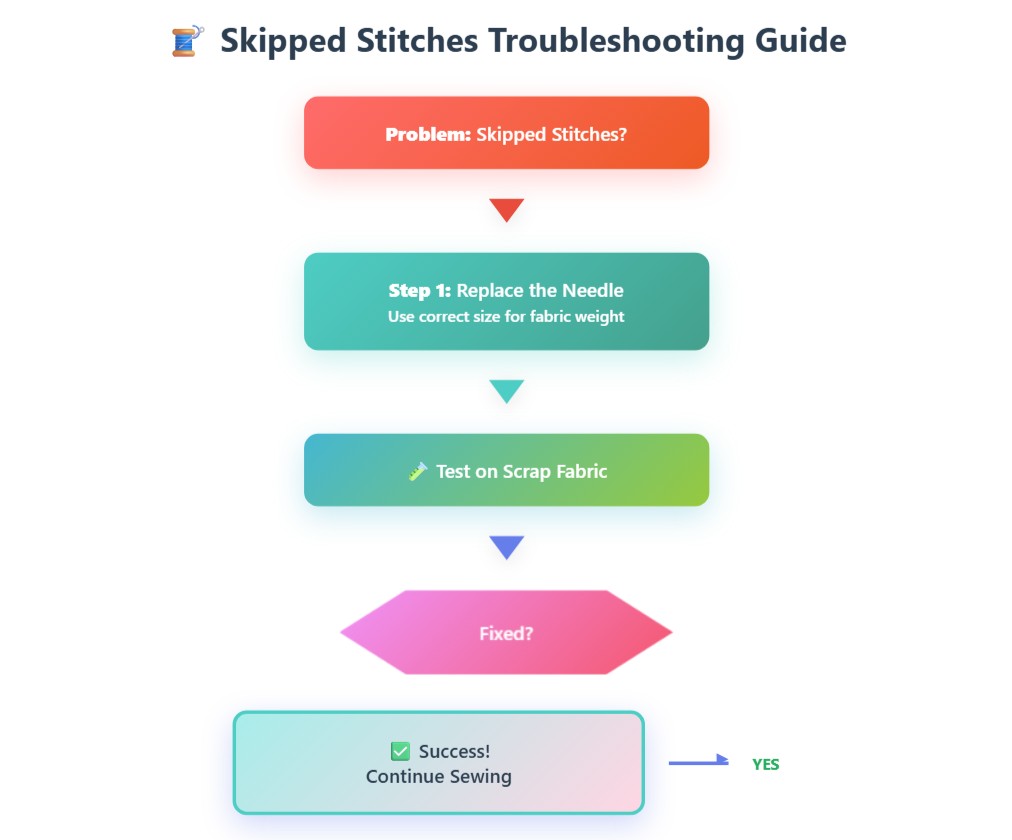
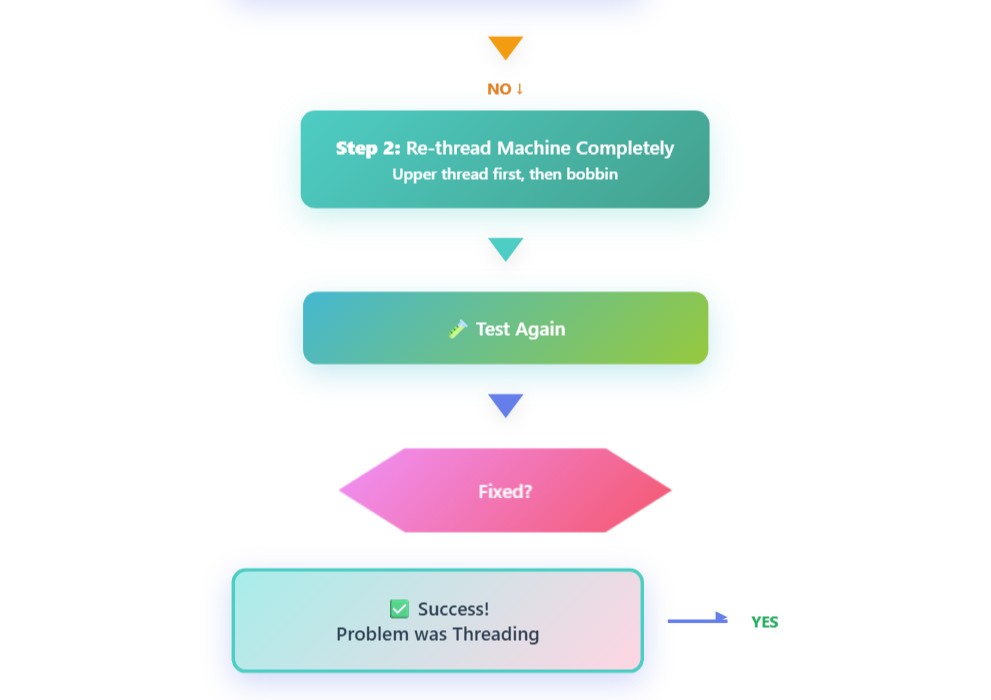
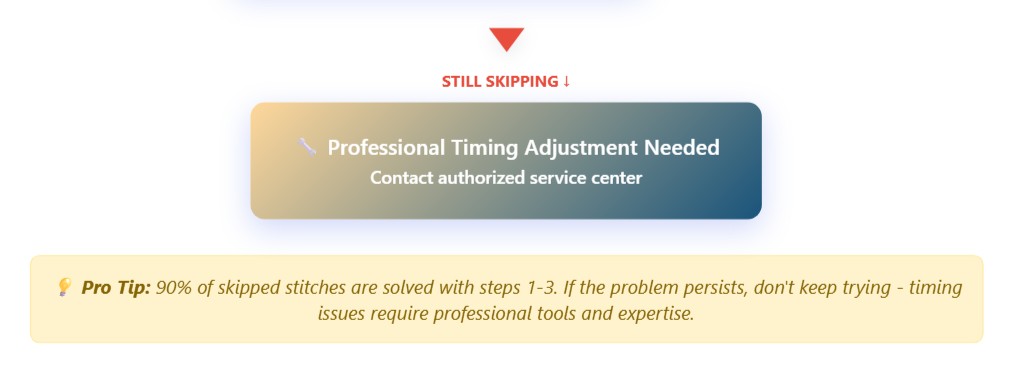
Skipped Stitches Flowchart
What is the most common problem for a sewing machine? Skipped stitches frustrate sewers more than any other issue, but the good news is that most cases follow a predictable pattern. Professional repair technicians use this exact troubleshooting sequence because it targets the most likely causes first.
Instead of randomly trying different solutions, follow this proven step-by-step process. This methodical approach saves time and prevents you from making the problem worse. The flowchart below shows the exact sequence that solves 90% of skipped stitch problems:
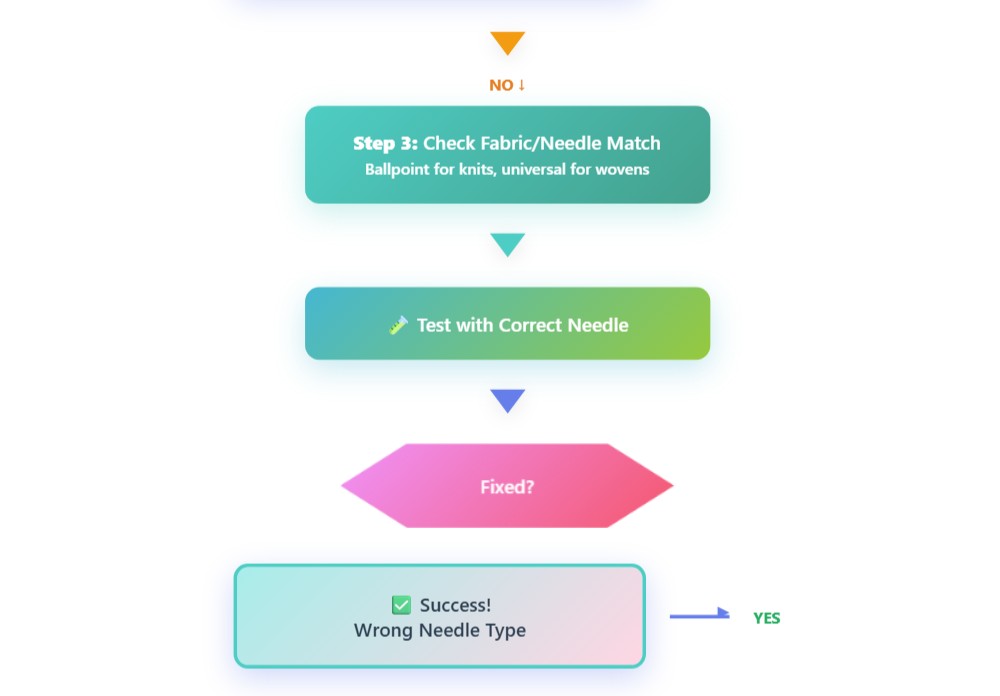
Needle Care and Replacement
How to take care of sewing needles? Replace them more often than you think you need to:
- How often should I change my sewing machine needle? Every 8-10 hours of sewing or with each new project
- Use the right needle for your fabric (ballpoint for stretchy fabrics, universal for cotton fabrics)
- Store needles in their original packaging to prevent damage
- Never force a stuck needle – it can damage timing
When working with different fabric types, matching your needle to the material prevents most stitching problems.
Maintenance Schedules by Usage Type
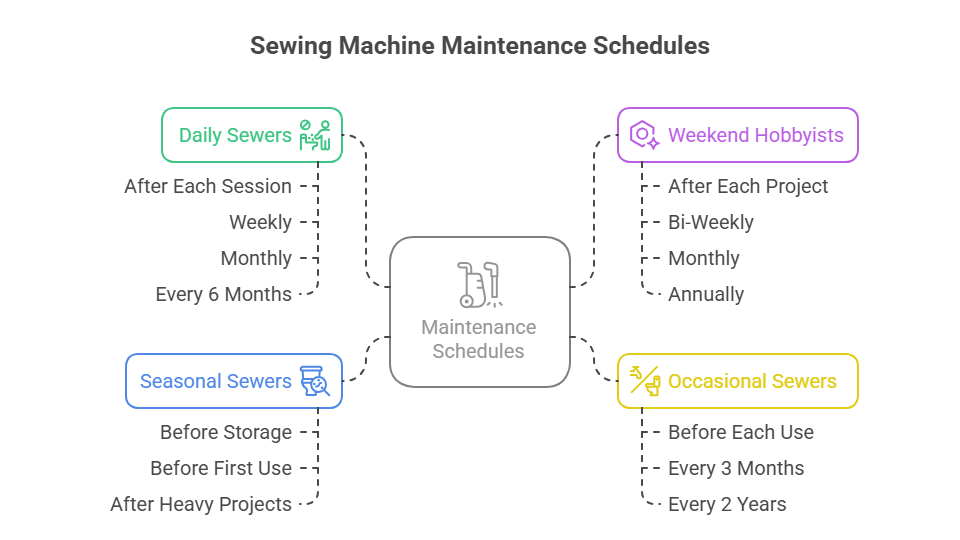
Your cleaning schedule should match how often you sew. Here are proven schedules that work:
Daily Sewers (4+ hours per day)
- After each session: Quick lint removal, cover machine
- Weekly: Full cleaning and oiling
- Monthly: Deep clean, check tension
- Every 6 months: Professional service
Weekend Hobbyists (5-10 hours per week)
- After each project: Basic lint cleanup
- Bi-weekly: Oil moving parts
- Monthly: Complete cleaning routine
- Annually: Professional service
Occasional Sewers (Monthly projects)
- Before each use: Quick inspection and light cleaning
- Every 3 months: Full maintenance routine
- Every 2 years: Professional service
Seasonal Sewers
- Before storage: Complete cleaning and oiling
- Before first use: Inspection and test run
- After heavy projects: Extra cleaning if working with heavy fabrics
Don’t want to figure out your schedule manually? Our maintenance schedule calculator does the work for you. Simply answer a few questions about your sewing habits, machine type, and project preferences to get a personalized maintenance timeline that fits your exact needs.
When to Seek Professional Help
Can you service a sewing machine yourself? Basic maintenance, yes. Complex repairs, definitely not.
DIY-Friendly Tasks
- Cleaning and basic oiling
- Needle and bobbin replacement
- Simple tension adjustments
- Basic troubleshooting
Leave These to the Professionals
- Timing adjustments
- Motor problems
- Electronic issues (computerized machines)
- Internal gear problems
How do I know if my sewing machine needs to be serviced? Watch for these warning signs:
- Unusual noises during operation
- Stitches that skip despite proper threading
- Difficulty turning the handwheel
- Burning smells
- Erratic stitch formation
How much does a sewing machine service cost? Professional servicing typically runs $75-100 for basic maintenance, not including parts. This might seem expensive, but it’s much cheaper than replacing a machine.
Is it worth getting a sewing machine serviced? For machines over $200 or with sentimental value, absolutely. For basic machines under $100, compare service cost to replacement cost.
Is it worth repairing an old sewing machine? Vintage machines from quality brands (Singer, Janome, Bernina) are often worth restoring. They were built to last and many parts are still available.
Common Mistakes That Damage Your Machine
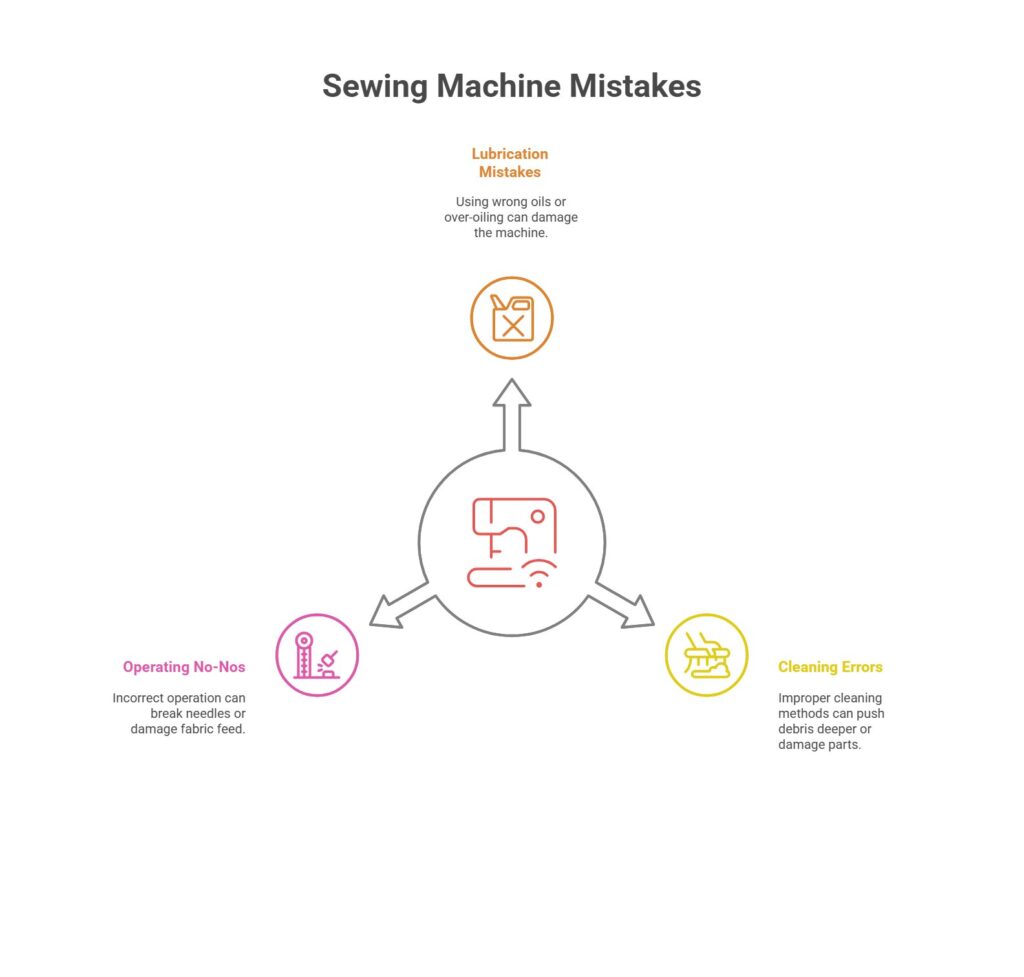
What not to do with a sewing machine? Avoid these machine-killers:
Lubrication Mistakes
- Using household oils (they get gummy)
- Over-oiling (attracts more dirt)
- Ignoring manufacturer’s oil points
- Mixing different oil types
Cleaning Errors
- Blowing compressed air into the machine (pushes debris deeper)
- Using harsh chemicals on plastic parts
- Forgetting to unplug before cleaning
- Forcing stuck parts
Operating No-Nos
- What not to do when using a sewing machine?
- Pulling fabric while sewing (damages feed dogs)
- Sewing over pins (breaks needles, damages timing)
- Using wrong thread weights
- Ignoring tension settings
What happens if you don’t oil a sewing machine? Metal parts wear faster, stitches become uneven, and you’ll eventually need expensive timing adjustments or motor replacement.
Creating Your Personal Maintenance Log
Track your machine’s health with a simple log that records hours of use, projects completed, maintenance performed, and any problems noticed. This helps you spot patterns and proves valuable if you need warranty service. Our digital maintenance log template makes it easy to record everything and automatically calculates statistics about your sewing machine’s care history.
Project-Specific Maintenance Tips
Different sewing projects create different maintenance needs:
After Quilting Projects
Quilting creates more lint than any other sewing. Clean your machine thoroughly after each quilt, paying special attention to:
- Feed dogs (cotton batting sticks everywhere)
- Bobbin area (thread dust accumulates quickly)
- Thread guides (cotton fibers wrap around guides)
After Working with Heavy Fabrics
Denim and other heavy materials stress your machine:
- Check needle condition (heavy fabrics dull needles faster)
- Inspect presser foot for damage
- Oil immediately after heavy-duty projects
After Delicate Fabric Projects
Working with silk or chiffon requires gentle handling:
- Clean lint that might snag delicate fabrics
- Check for rough spots on needle plate
- Verify smooth thread path
Modern Machine Considerations
Do modern sewing machines need servicing? Yes, though some maintenance needs have changed:
Computerized Machines
- Need protection from dust and moisture
- Software updates may be available
- Electronic components can fail suddenly
- Still need basic cleaning and oiling
Sealed Bearing Machines
Some newer machines have bearings that never need oil, but they still need:
- Regular cleaning
- Tension adjustments
- Professional timing checks
Cost-Benefit Analysis: Maintenance vs. Replacement
Let’s crunch the numbers on why maintenance makes financial sense:
Annual Maintenance Investment
- Basic tools and supplies: $25-50 (one-time)
- Annual oil and cleaners: $15-25
- Professional service: $75-100 (every 1-2 years)
- Total annual cost: $40-75
Machine Replacement Costs
- Basic machine: $100-300
- Quality mid-range: $300-800
- Professional grade: $800-3,000+
A $50 annual investment can extend a $500 machine’s life from 5 years to 20+ years. That’s a return of 300-400% on your maintenance investment.
Downloadable Maintenance Checklist
Print this checklist and keep it with your machine:
Daily (After Each Session): □ Remove lint from needle area □ Cover machine □ Check thread path is clear
Weekly (Heavy Users): □ Clean bobbin area □ Oil designated points □ Check needle condition □ Wipe down exterior
Monthly: □ Remove needle plate, clean thoroughly □ Deep clean feed dogs □ Check all screws are tight □ Test all stitches on scrap fabric
Annually: □ Professional service □ Replace worn accessories □ Update any available software □ Inspect electrical cord
Troubleshooting Quick Reference
| Problem | Most Likely Cause | Quick Fix |
|---|---|---|
| Thread bunching | Incorrect threading | Re-thread completely |
| Skipped stitches | Dull/bent needle | Replace needle |
| Fabric won’t feed | Lint in feed dogs | Clean feed dog area |
| Uneven stitches | Tension issues | Check thread path, adjust tension |
| Needle breaks | Wrong needle type | Match needle to fabric |
| Machine jams | Thread caught somewhere | Clear all thread, re-thread |
Expert Tips for Long-Term Success
Professional repair technicians shared these insider secrets:
Use Quality Thread
Cheap thread sheds microscopic fibers that accumulate inside your machine. Quality thread actually saves money in reduced maintenance.
Match Needles to Projects
Keep different needle types on hand:
- Universal (size 11-14) for cotton and blends
- Ballpoint for knits
- Heavy-duty for denim
- Microtex for delicate fabrics
Temperature Matters
Store your machine in a climate-controlled area. Humidity changes can affect tension and cause rust.
Cover When Not in Use
A simple fabric cover prevents 90% of dust accumulation. You can even make your own cover as a fun first project.
Frequently Asked Questions
How often do sewing machines need servicing?
For regular home use, every 12-18 months is plenty. Heavy users (daily sewing) should service every 6-12 months. Occasional sewers can go 2-3 years between professional services.
Can I clean my own sewing machine?
Absolutely! Basic cleaning and oiling are well within most sewers’ abilities. Your owner’s manual has specific instructions for your model.
What is the perfect order when cleaning the sewing machine?
Start from the outside and work in: exterior, needle area, remove needle plate, clean feed dogs, clean bobbin area, clean upper thread path, oil, reassemble, test.
Can you service a sewing machine yourself?
Basic maintenance like cleaning, oiling, and simple adjustments are DIY-friendly. Leave timing, motor issues, and complex repairs to professionals.
How do I know if my sewing machine is worn out?
Warning signs include: consistent skipped stitches after proper maintenance, unusual noises that cleaning doesn’t fix, difficulty maintaining tension, and frequent needle breakage with proper needles.
How can I create a personalized maintenance schedule?
Use our maintenance schedule calculator to get a custom care plan based on how often you sew, what projects you work on, and your machine type. The tool provides specific timelines for daily, weekly, monthly, and annual maintenance tasks.
What should I do when my machine has problems?
Don’t guess! Our problem diagnosis tool walks you through questions to identify your exact issue and provides professional-level solutions. It covers 95% of common sewing machine problems with step-by-step fixes.
Conclusion
Maintaining your sewing machine doesn’t have to be complicated or time-consuming. The few minutes you spend cleaning and oiling after each project will save you hours of frustration and hundreds of dollars in repairs down the road.
Remember these key takeaways:
- Start Simple: Even basic maintenance dramatically improves your machine’s performance. Don’t feel overwhelmed – begin with just covering your machine and cleaning lint after each project.
- Consistency Beats Perfection: A quick cleaning every time beats a perfect cleaning once in a while. Build maintenance into your sewing routine and it becomes automatic.
- Know Your Limits: Handle basic cleaning and oiling yourself, but don’t hesitate to seek professional help for complex issues. A $75 service call is much cheaper than a damaged machine.
- Invest in Quality: Good tools, proper oils, and quality thread actually save money by reducing maintenance needs and extending your machine’s life.
- To make maintenance even easier, we’ve created three free tools to support your sewing machine care: a maintenance schedule calculator for personalized care plans, a problem diagnosis tool for instant troubleshooting, and a maintenance log template for tracking your machine’s health over time. These tools work together to keep your machine running perfectly with minimal effort.
- Track Everything: Keep a simple log of maintenance and problems. This helps you spot patterns and provides valuable information if you need professional service.
Your sewing machine is an investment in your creativity. Whether you’re learning basic stitches or creating complex garments, a well-maintained machine makes every project more enjoyable and successful.
The goal isn’t to become a repair technician – it’s to keep your creative partner running smoothly so you can focus on what you love: bringing your ideas to life through fabric and thread. With these maintenance habits, your machine will serve you faithfully for decades to come.