Master Professional Sewing Techniques with Expert Tips on Measurements, Tools, and Troubleshooting
That unassuming strip of fabric between stitches holds more power than most sewers realize. Seam allowances act as safety nets and blueprints combined, shaping everything from garment structure to future adjustments. Whether sewing delicate lace fabric or sturdy cotton fabric, understanding seam allowances transforms good sewing into professional results.
What Is Seam Allowance and Why It Matters
Seam allowance is the distance between the stitching line and the raw edge of fabric. This margin ensures pieces join securely while preventing fraying and unraveling. The difference between a seam and seam allowance is simple: the seam is where pieces connect, while seam allowance is the extra fabric that makes this connection possible.
Precision in seam allowance width determines how clothes move with the body. Too narrow, and stitches might unravel under stress. Too wide, and bulkiness ruins sleek silhouettes. The 5/8-inch standard in commercial patterns offers balance between enough material for alterations without wasting resources.
Why Seam Allowances Are Essential
Consistent measurements prevent puckering when joining curved edges like armholes. They also protect against fraying in delicate materials like chiffon or silk. The iron becomes more effective when pressing open adequate allowances, creating crisp professional finishes that separate homemade from handmade.
Historical Evolution of Seam Allowances
How did dressmakers centuries ago manage their fabric edges? Their choices reveal surprising insights into cultural priorities and material scarcity. Tailoring traditions evolved distinct approaches to seam margins based on available resources and garment usage.
Seam Allowance Practices Through the Centuries
Medieval artisans often used 1/4-inch margins on wool tunics. Precious silks in Renaissance Italy demanded even narrower seams to conserve material. A 15th-century tailoring manual advised, “Waste not the cloth, for it carries the labor of ten hands.”
By the 1800s, cotton’s affordability changed practices. Dressmakers left 1/2-inch spaces in muslin mockups before cutting final fabrics. This approach minimized errors in expensive satins and brocades used for formal wear.
Historical textile collections at the Smithsonian National Museum of American History document these evolving practices, showing how economic factors directly influenced construction techniques across different periods.
Seam Allowance Evolution Chart:
| Period | Typical Width | Common Fabrics | Key Reason |
|---|---|---|---|
| Medieval | 1/4 inch | Wool, linen | Fabric scarcity |
| Renaissance | 3/8 inch | Silk, velvet | Material cost |
| 18th-19th Century | 1/2 inch | Muslin, cotton | Mockup adjustments |
| Industrial Era | 5/8 inch | Broadcloth | Standardization |
| Modern | Variable | All types | Customization |
Regional differences flourished too. French tailors favored wider seams for structured corsets, while Japanese kimono makers used hairline margins to showcase intricate prints. These variations show how local needs shaped techniques.
The evolution of seam allowance standards reflects broader changes in textile availability, technology, and cultural priorities. This timeline illustrates how economic factors and technical innovations shaped the measurements we use today

Understanding this historical progression helps modern sewers make informed decisions about seam allowance width based on fabric type and project requirements
When recreating period pieces today, that 1/2-inch standard in vintage patterns helps maintain authenticity. It also gives room to adjust fits, just as historical crafters did when refining their masterpieces.
International Seam Allowance Standards
Different countries developed unique standards based on measurement systems and cultural preferences. Understanding these differences helps when working with patterns from various sources.
Global Standard Comparison
United States Standard: 5/8 inch (1.5cm) remains the industry standard. This measurement emerged with industrial sewing machines for consistent production while allowing fitting adjustments.
European Standard: Many European patterns use 1cm (3/8 inch) allowances or omit them entirely. Burda patterns famously exclude seam allowances, requiring sewers to add their preferred width.
Japanese Standard: Japanese patterns typically include 1cm allowances, though some traditional techniques use even smaller measurements for refined finishes.
When working with international patterns, our comprehensive seam allowance conversion charts provide instant reference for all common measurements across different sewing traditions.
Fashion education institutions like the Fashion Institute of Technology continue to document how these international differences affect modern pattern making and garment construction techniques
Conversion Quick Reference:
- 1/4 inch = 6mm
- 3/8 inch = 1cm
- 1/2 inch = 1.3cm
- 5/8 inch = 1.5cm
- 3/4 inch = 2cm
- 1 inch = 2.5cm
For quick and accurate conversions between imperial and metric measurements, use our seam allowance calculator to ensure precision in your projects.
Visual comparisons make it easier to understand the practical differences between measurement systems and applications. These charts provide quick reference guides for converting between imperial and metric measurements while showing how different regions and sewing applications use varying standards
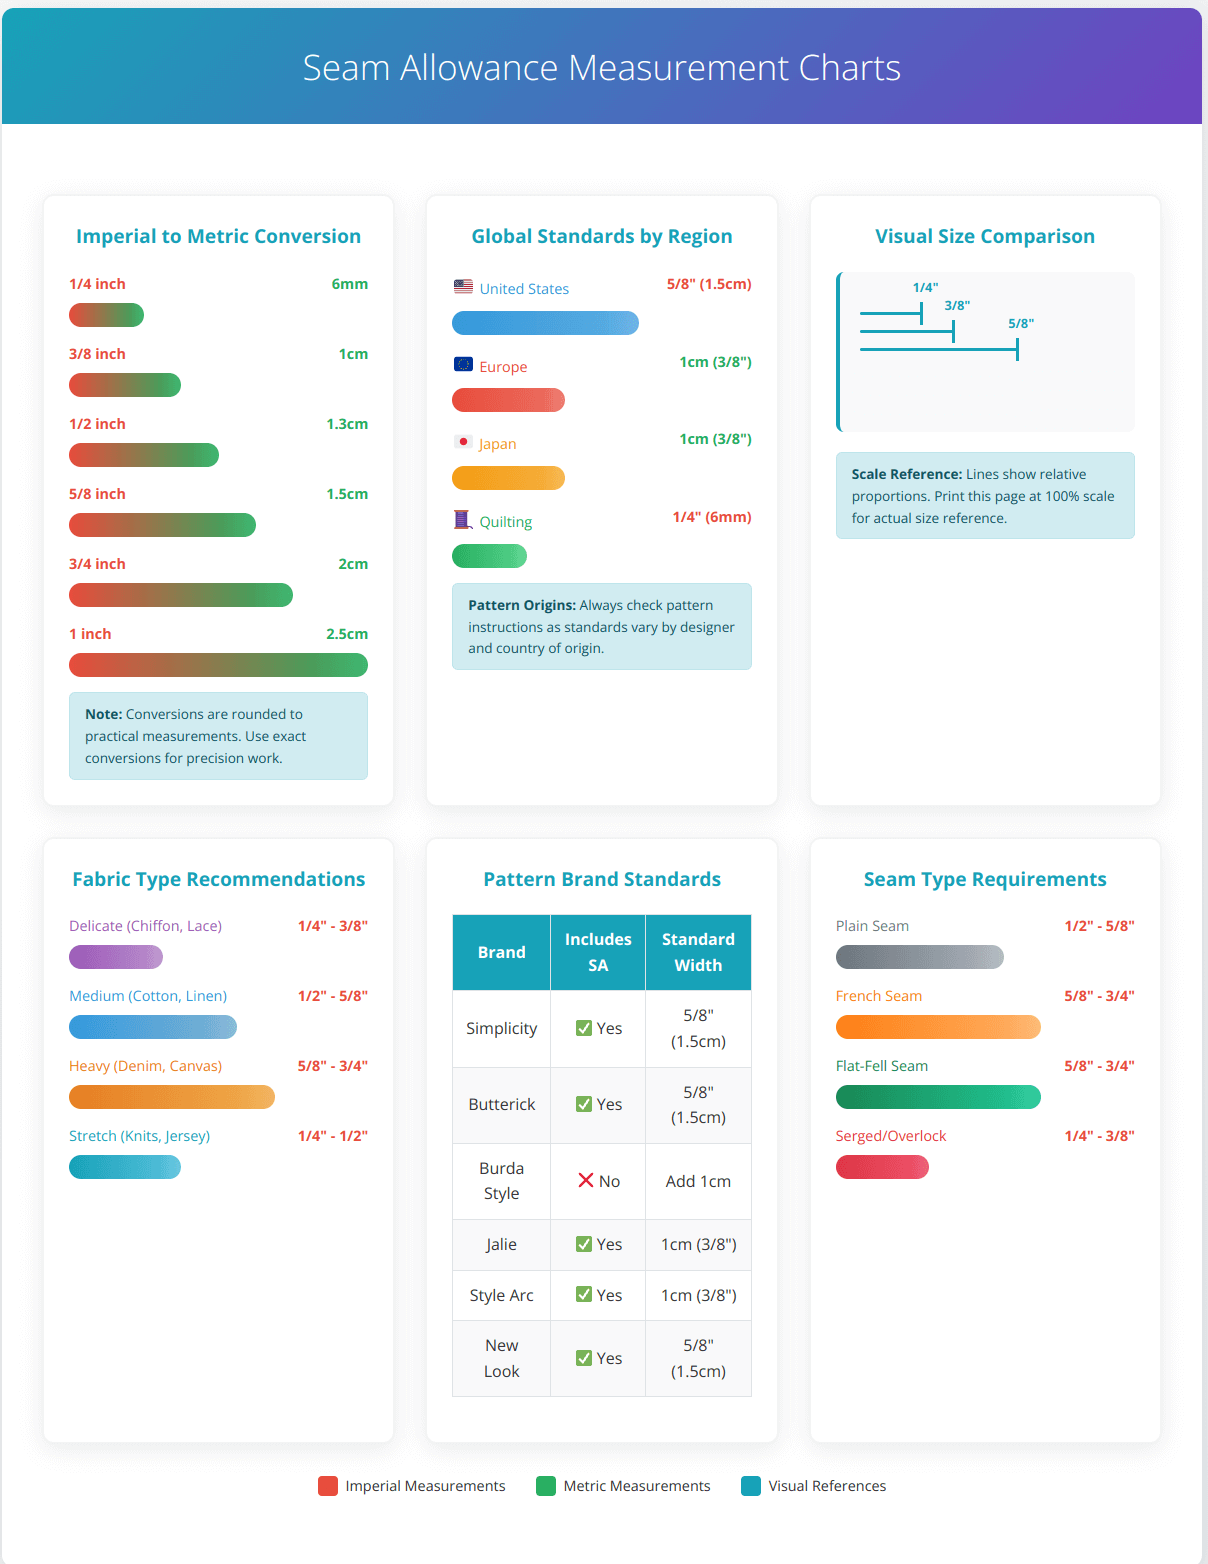
These visual references serve as practical tools for pattern selection and fabric planning, ensuring accurate seam allowances regardless of pattern origin or measurement system preference
Do Patterns Include Seam Allowances?
This varies significantly by brand and origin:
Patterns WITH seam allowances included:
- Simplicity, Butterick, McCall’s (5/8 inch standard)
- New Look patterns (5/8 inch)
- Style Arc patterns (1cm metric)
- Jalie patterns (1cm metric)
Patterns WITHOUT seam allowances:
- Burda Style magazine patterns
- Many European indie designers
- Traditional Japanese patterns
- Some historical reproduction patterns
How to Tell if Patterns Include Seam Allowance:
- Check pattern instructions or envelope
- Look for cutting lines vs stitching lines marked separately
- Measure distance between size lines (should be consistent if allowances included)
- European patterns often state “seam allowances NOT included”
See visual examples of how seam allowances appear on different pattern pieces in our pattern piece seam allowance examples guide.
Standard Measurements and Their Applications
Why do modern patterns use specific seam margins? These numbers balance practical needs with centuries of refinement. Each width serves distinct purposes, balancing material efficiency with construction demands.
Understanding Common Allowance Widths
5/8-inch (1.5cm) – The Commercial Standard The traditional seam allowance width dominates commercial patterns. Pattern companies adopted this width to provide space for fitting tweaks without wasting fabric. It’s wide enough to prevent fraying on medium-weight materials like cotton poplin.
Need to calculate seam allowances for your specific project? Our seam allowance calculator helps determine the perfect width based on your fabric type and construction method.
1/2-inch (1.3cm) – Historical Preference Historical costume patterns often use 1/2-inch seams. This reflects older methods where tailors made mockups from cheap muslin before cutting expensive silks. The narrower margin conserved resources while allowing precise adjustments.
1/4-inch (6mm) – Precision Work For tiny garments like doll clothes, 1/4-inch seams reduce bulk. A 1/4-inch seam allowance maintains structure in small-scale projects without overwhelming delicate proportions. It’s ideal when working with lightweight fabrics or tight curves.
3/8-inch (1cm) – European Standard Many European patterns use this metric-friendly measurement. It provides adequate security while remaining easy to sew accurately.
Industry Standards for Different Applications
Garment Construction: 5/8 inch remains the industry standard for commercial clothing production. This allows for consistent manufacturing while providing adjustment room.
Quilting: 1/4 inch is standard for piecing quilt blocks. This narrow allowance creates precise points and reduces bulk in multiple layer intersections.
Home Decor: Often uses 1/2 to 1 inch allowances for durability and easier handling of heavier fabrics.
Children’s Clothing: May use larger allowances (3/4 to 1 inch) to accommodate growth and frequent washing.
Fabric-Specific Seam Allowance Selection
The choice of seam allowance depends heavily on fabric characteristics. Different materials require different approaches for optimal results.
Choosing the right seam allowance can feel overwhelming with so many variables to consider. This decision tree simplifies the process by guiding you through the key factors that determine optimal seam allowance width
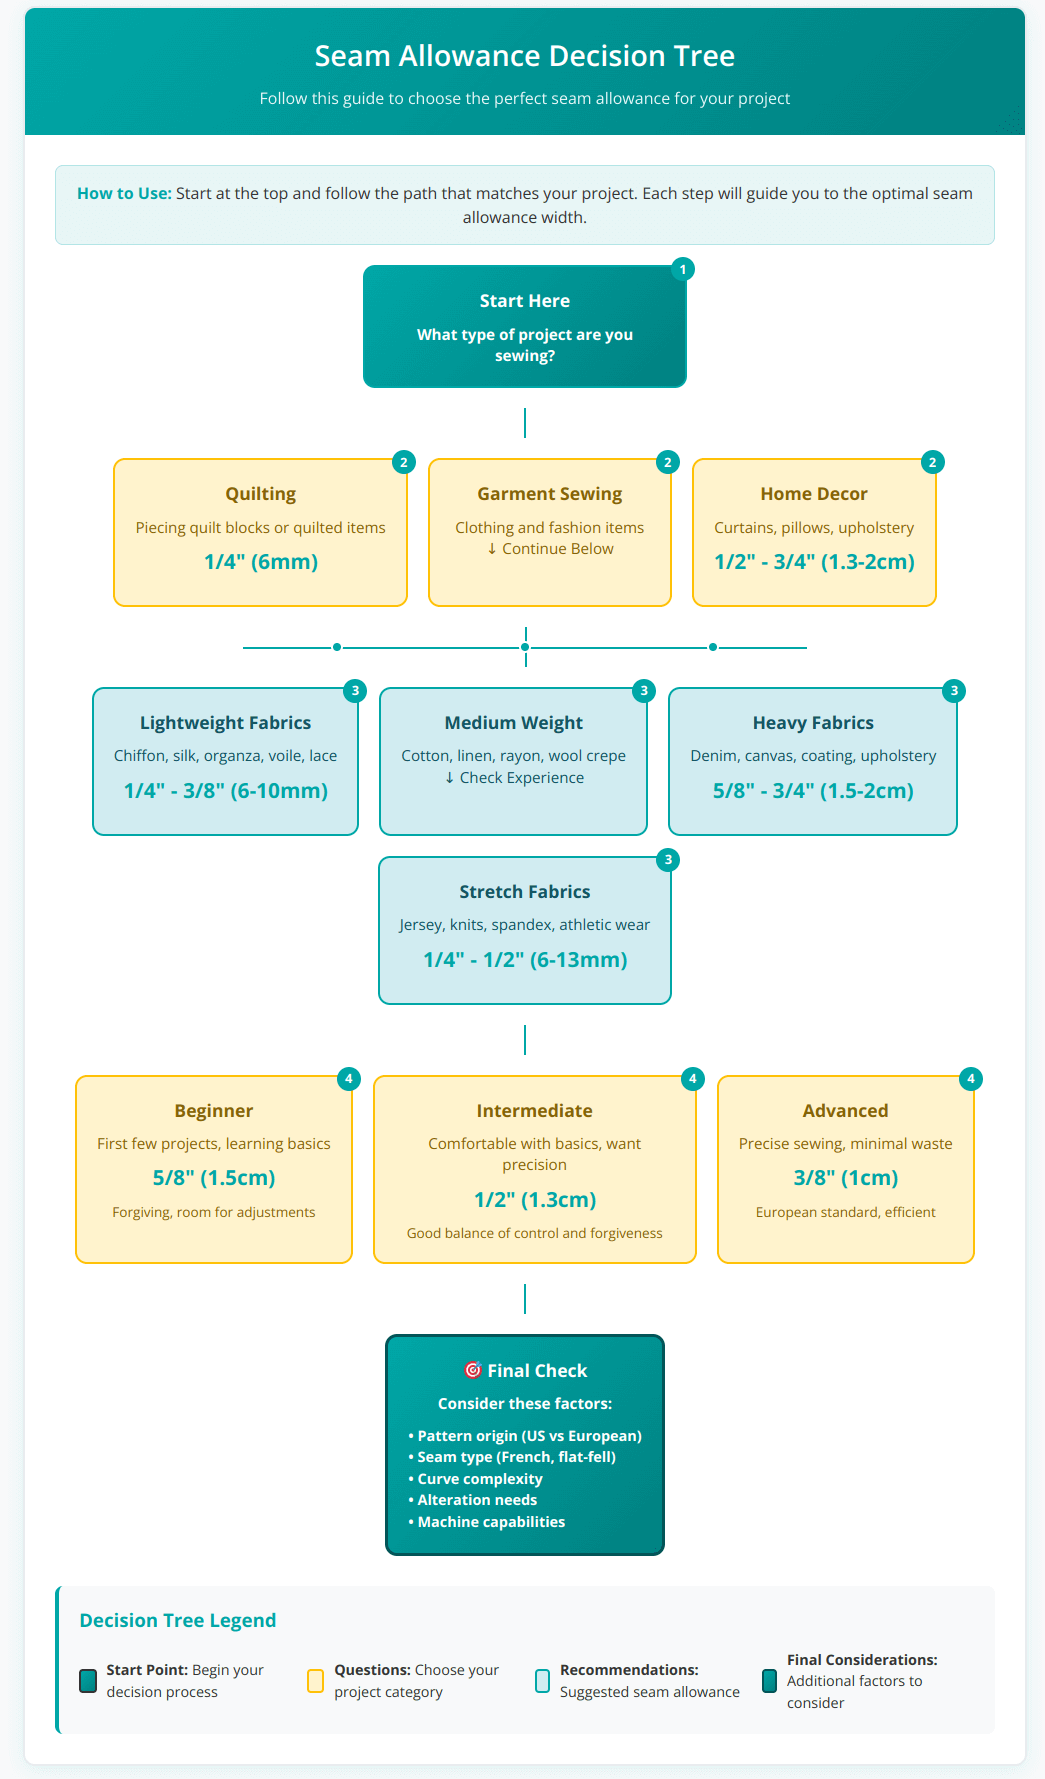
This systematic approach ensures you select appropriate seam allowances based on your specific project requirements, fabric characteristics, and skill level. Remember that these are starting recommendations – always test on fabric scraps first.
Seam Allowance Decision Tree
For Lightweight Fabrics (Chiffon, Organza, Voile):
- Use 1/4 to 3/8 inch allowances
- Prevents bulk in delicate garments
- Consider French seams for clean finishes
For Medium-Weight Fabrics (Cotton, Linen, Wool Crepe):
- Standard 1/2 to 5/8 inch works well
- Provides stability without excess bulk
- Easy to press and finish
For Heavy Fabrics (Denim, Canvas, Wool Coatings):
- Use 5/8 to 3/4 inch allowances
- Extra width supports stress points
- Accommodates bulkier seam finishes
For Stretch Fabrics (Jerseys, Knits):
- Generally use 1/4 to 1/2 inch
- Narrower allowances prevent stretching distortion
- Consider serged edges for stretch retention
Special Fabric Considerations
Lace Fabrics: When working with beaded lace or Chantilly lace, use minimal allowances (1/4 inch) to showcase the pattern without bulk.
Fraying Fabrics: Materials that fray easily benefit from wider allowances (5/8 to 3/4 inch) combined with proper edge finishing.
Bias-Cut Pieces: Often require narrower allowances (3/8 to 1/2 inch) to prevent distortion during handling.
Types of Seams and Their Allowance Requirements
Different seam types require specific allowance widths for proper construction. Understanding these requirements ensures professional results.
Different seam construction methods require specific allowance widths for optimal results. This visual guide shows the seven most important seam types every sewer should master, along with their precise allowance requirements.
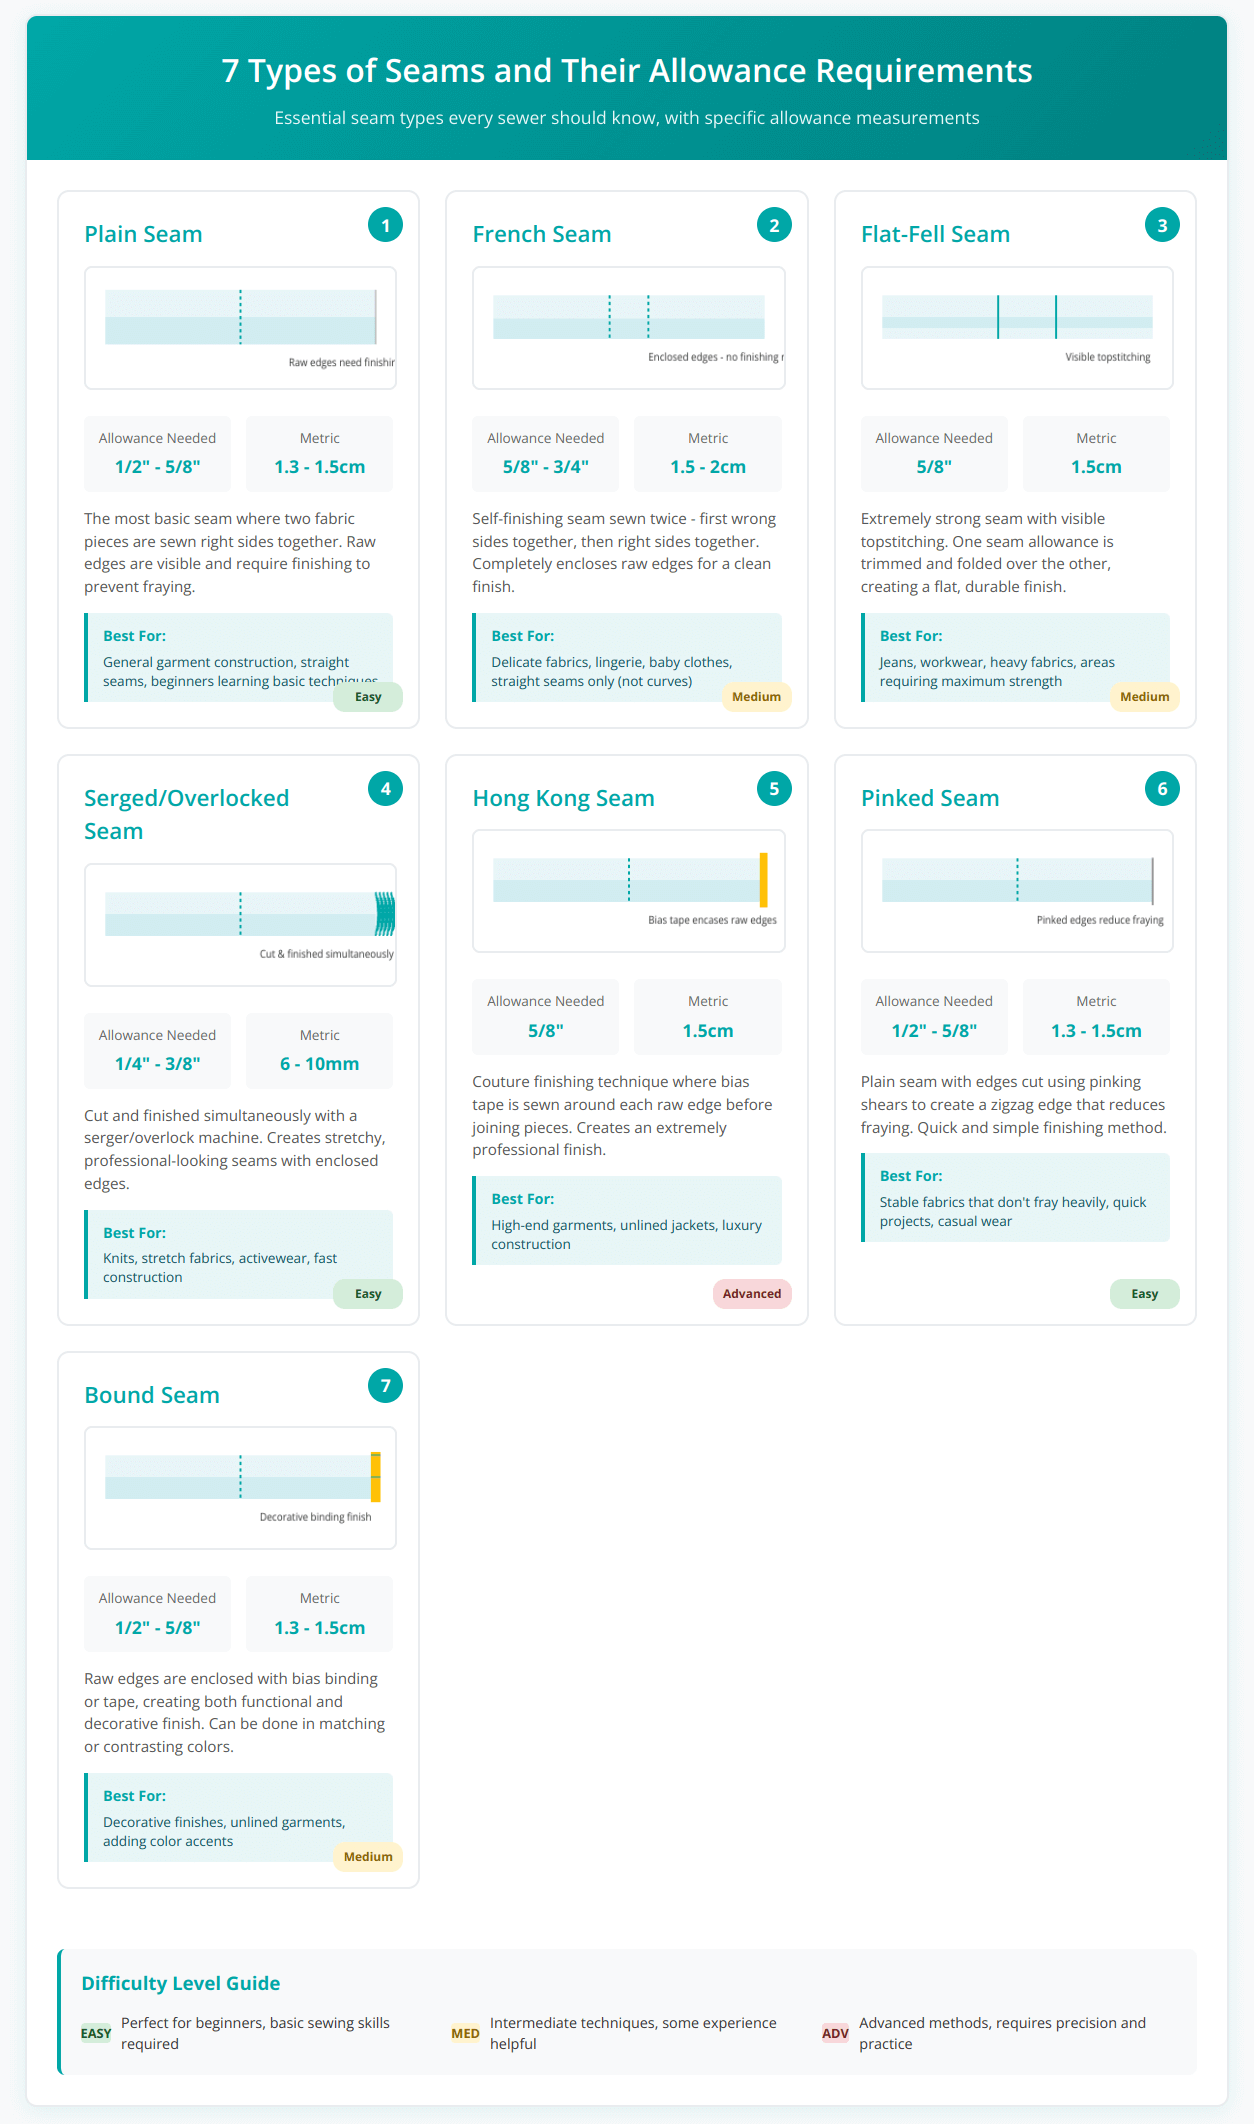
Understanding these seam types and their allowance requirements enables you to choose the most appropriate construction method for your fabric, project type, and skill level. Each seam serves specific purposes and creates different aesthetic and functional results.
The 7 Different Types of Seams
1. Plain Seam
- Allowance needed: 1/2 to 5/8 inch
- Most common seam type
- Requires edge finishing to prevent fraying
2. French Seam
- Allowance needed: 5/8 to 3/4 inch total (trimmed in stages)
- Self-finishing seam ideal for delicate fabrics
- Creates enclosed raw edges
3. Flat-Fell Seam
- Allowance needed: 5/8 inch (graded during construction)
- Extremely strong seam used in jeans and workwear
- Visible topstitching creates decorative element
4. Serged/Overlocked Seam
- Allowance needed: 1/4 to 3/8 inch
- Cuts and finishes edges simultaneously
- Ideal for knits and stretchy fabrics
5. Hong Kong Seam
- Allowance needed: 5/8 inch
- Bias tape finishes raw edges
- Professional couture finish
6. Pinked Seam
- Allowance needed: 1/2 to 5/8 inch
- Uses pinking shears to reduce fraying
- Quick finish for stable fabrics
7. Bound Seam
- Allowance needed: 1/2 to 5/8 inch
- Bias binding encases raw edges
- Decorative and functional finish
French Seam History and Technique
The history of the French seam dates back to the 18th century when it was developed for fine linens and undergarments. This seam type creates a completely enclosed finish by sewing twice – first with wrong sides together, then right sides together.
French Seam Allowance Requirements:
- Start with 5/8 inch total allowance
- First seam: sew 1/4 inch from edge
- Trim to 1/8 inch
- Second seam: sew 3/8 inch from fold
When NOT to Use French Seams:
- Curved seams (creates puckering)
- Very thick fabrics (too bulky)
- Seams requiring ease or gathering
- Princess seams or fitted areas
Flat-Fell vs French Seams
Flat-Fell Seams:
- Stronger construction
- Visible topstitching
- Better for straight seams
- Used in jeans and workwear
French Seams:
- Completely enclosed raw edges
- Invisible from right side
- Better for delicate fabrics
- Preferred for lingerie and fine garments
Seam Allowance Tools and Techniques
Achieving accurate seam allowances requires the right tools and techniques. Modern sewers have access to various aids that ensure consistent results.
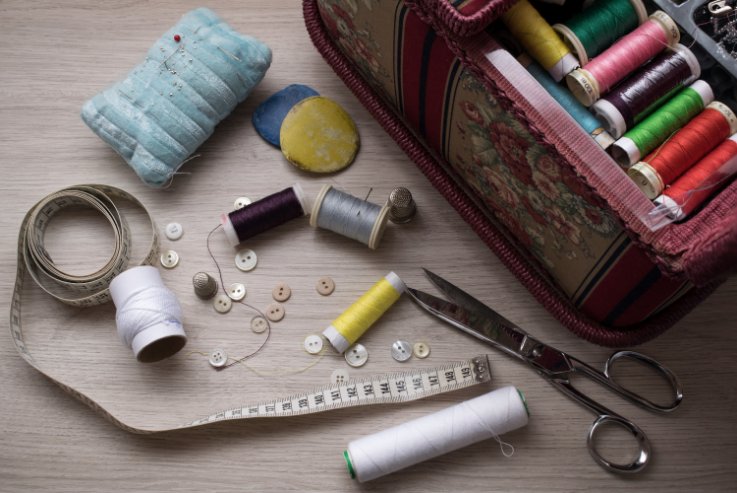
Essential Tools for Accurate Seam Allowances
Magnetic Seam Guides These attach to the machine’s throat plate and provide a physical barrier for fabric placement. They’re easily adjustable and work well for straight seams.
Specialized Presser Feet
- 1/4-inch foot: Perfect for quilting and precise work
- Edge-stitching foot: Maintains consistent distance from edges
- Zipper foot: Allows close stitching to bulky seams
Learn more about different sewing machine presser feet and their specific applications.
Seam Gauges and Rulers Adjustable seam gauges help mark curved allowances consistently. Clear rulers work best for straight measurements and pattern drafting.
Marking Tools
- Washable fabric markers
- Tailor’s chalk
- Tracing wheels with carbon paper
- Temporary tape (washi tape works well)
Modern Measuring Techniques
Using Machine Markings Most machines have throat plate markings indicating common seam allowances. Test these with a ruler as they’re not always accurate.
Tape Method Place painter’s tape or washi tape at desired seam width. This creates a visual and tactile guide without machine modifications.
Needle Position Adjustment Many machines allow needle position changes. Moving the needle adjusts seam width while keeping fabric at the same guide position.
Testing and Adjusting Techniques
Always test seam allowances on fabric scraps before cutting final pieces. This reveals how materials behave and whether adjustments are needed.
Quick Test Method:
- Cut two fabric scraps
- Sew at chosen allowance width
- Measure actual seam width
- Adjust if necessary
Troubleshooting Common Seam Allowance Problems
Even experienced sewers encounter seam allowance issues. Recognizing and fixing these problems prevents project failures.
Uneven Seam Widths
Causes:
- Inconsistent fabric guidance
- Machine needle wandering
- Inadequate guides or markings
- Rushing through curved seams
Solutions:
- Use magnetic seam guides
- Slow down on curves
- Mark challenging areas with chalk
- Practice on scraps first
For comprehensive troubleshooting help, check our seam allowance troubleshooting guide.
Fabric Shifting During Sewing
Prevention Techniques:
- Pin adequately (every 2-3 inches on curves)
- Use proper presser foot pressure
- Choose appropriate thread tension
- Support heavy fabrics properly
Seam Allowance Show-Through
This problem occurs with transparent or light-colored fabrics where seam allowances are visible from the right side.
Solutions:
- Use matching thread colors
- Grade seam allowances (trim to different lengths)
- Choose appropriate underlining
- Consider bound seam finishes
Puckering at Curved Seams
Causes:
- Seam allowance too wide for curve
- Inadequate clipping or notching
- Wrong stitch length
- Excessive pulling during sewing
Solutions:
- Reduce allowance width to 3/8 or 1/4 inch
- Clip curves properly (almost to stitching line)
- Use shorter stitch length
- Let feed dogs move fabric naturally
Fraying Despite Proper Allowances
Fabric-Specific Solutions:
- Increase allowance width
- Apply liquid seam sealant
- Use pinking shears
- Switch to enclosed seam types (French, flat-fell)
Pattern Layout and Cutting Considerations
Proper pattern layout affects seam allowance success. Understanding these principles prevents cutting errors and ensures adequate fabric usage.
Two Essential Pattern Layout Rules
1. Consider Seam Allowance in Fabric Requirements When patterns don’t include seam allowances, calculate additional fabric needed. Generally add 1/4 yard for seam allowances on most garments.
2. Maintain Grain Line Accuracy Proper grain line placement affects how seam allowances behave. Off-grain cutting can cause uneven stretching and puckering.
Adding Seam Allowances to Patterns
When working with patterns that don’t include seam allowances:
Method 1: Pattern Paper Addition
- Trace pattern pieces onto paper
- Add desired allowance around all edges
- Mark grain lines and notches
- Cut new pattern pieces
For detailed visual guidance on adding seam allowances to various pattern shapes and curves, check our pattern piece seam allowance examples with step-by-step illustrations.
Method 2: Direct Fabric Addition
- Place pattern on fabric
- Mark seam allowance around pattern edges
- Cut along marked lines
- Transfer pattern markings
Special Considerations:
- Don’t add allowances to “place on fold” edges
- Match allowance widths where seams join
- Consider construction methods when choosing widths
Advanced Seam Allowance Applications
Professional garment construction often requires specialized seam allowance techniques. These advanced methods create couture-quality results.
Grading Seam Allowances
Grading involves trimming seam allowances to different lengths to reduce bulk. This technique is essential for professional-looking garments.
When to Grade:
- Faced edges (necklines, armholes)
- Curved seams
- Multiple fabric layers
- Areas that will be pressed flat
Learn detailed grading techniques in our seam allowance grading guide.
Princess Seam Considerations
Princess seams, invented in the 1840s, require special attention to seam allowances due to their curved nature.
Princess Seam Allowance Tips:
- Use 5/8 inch standard width
- Clip curves carefully
- Grade allowances for smooth pressing
- Consider stay-stitching for stability
Seam Rippers and Correction Tools
Understanding seam rippers helps when corrections are needed. The seam ripper was invented in the 1950s by a seamstress frustrated with removing stitches.
Proper Seam Ripper Use:
- Cut every 3-4 stitches on one side
- Pull thread from opposite side
- Clean away thread remnants
- Press area smooth before re-sewing
Specialty Seam Techniques
Some seaming methods require specific allowance considerations for optimal results.
English Seams vs French Seams
English Seams (also called run-and-fell seams):
- More durable than French seams
- Require 5/8 to 3/4 inch initial allowance
- Create flat, strong finish
- Better for heavy fabrics
French Seam Disadvantages:
- Not suitable for thick fabrics
- Difficult on curves
- Requires precise stitching
- Takes longer to complete
Machine-Fell Seams: The Strongest Option
Machine-fell seams and French seams are considered the strongest because they enclose raw edges completely while creating multiple rows of stitching.
Why They’re Strongest:
- Double stitching lines
- No raw edges to fray
- Stress distributed over wider area
- Self-reinforcing construction
Modern Sewing Machine Considerations
Today’s sewing machines offer features that improve seam allowance accuracy. Understanding these capabilities enhances sewing precision.
Machine Features for Better Allowances
Automatic Seam Allowance Functions:
- Some machines have preset allowance widths
- Computerized machines may offer guidance systems
- Industrial machines often include built-in guides
Maintenance for Accuracy: Regular sewing machine maintenance ensures consistent stitch formation and feed. This directly affects seam allowance precision.
Stitch Selection Impact
Different sewing machine stitches may require allowance adjustments:
- Zigzag stitches need wider allowances
- Stretch stitches work with narrower allowances
- Decorative stitches may require specific widths
Quality Control and Professional Standards
Professional sewers maintain consistent seam allowance standards throughout projects. These practices ensure predictable, high-quality results.
Industry Quality Standards
Commercial Manufacturing:
- Tolerance of ±1/8 inch acceptable
- Automated cutting ensures consistency
- Quality control checks random pieces
- Specific allowances for different garment areas
Couture Standards:
- Hand-basted seams for fitting
- Individual attention to each seam
- Custom allowances based on fabric and design
- Multiple fittings ensure perfect results
Home Sewing Best Practices
Consistency Measures:
- Use same tools throughout project
- Mark allowances when in doubt
- Test techniques on scraps
- Document successful combinations for future use
Quality Checks:
- Measure actual seam widths periodically
- Check for even pressing results
- Ensure all seams lie flat
- Verify pattern matching at seams
Care and Pressing Considerations
Proper seam allowance care extends garment life and maintains appearance. Different allowance widths require specific pressing techniques.
Pressing Techniques by Allowance Width
Narrow Allowances (1/4 to 3/8 inch):
- Press carefully to avoid creating ridges
- Use pressing cloth on delicate fabrics
- Consider steam over direct heat
Standard Allowances (1/2 to 5/8 inch):
- Press open for flat appearance
- Grade if necessary before pressing
- Use appropriate heat for fabric type
Wide Allowances (3/4 inch and above):
- Often pressed to one side
- May require grading to reduce bulk
- Consider topstitching for stability
Long-Term Care
Proper seam allowance finishing affects how garments age:
- Raw edges that fray shorten garment life
- Well-finished allowances maintain shape
- Quality pressing preserves professional appearance
Learn more about proper fabric care in our fabric care guides.
Common Sewing Mistakes to Avoid
Understanding frequent seam allowance errors helps prevent project problems. These mistakes can usually be corrected with proper knowledge.
Cutting Errors
Insufficient Allowance:
- Cannot be easily corrected
- May require piecing or redesign
- Prevention better than correction
Inconsistent Widths:
- Causes fitting problems
- Creates uneven stress distribution
- Affects garment drape
For comprehensive error prevention, see our common sewing mistakes guide.
Measurement Mistakes
Wrong Conversion:
- Imperial to metric errors common
- Double-check conversions
- Use reliable conversion charts
Machine Accuracy Issues:
- Throat plate markings may be inaccurate
- Test with ruler before relying on guides
- Adjust needle position if needed
Conclusion
Seam allowances represent far more than simple fabric margins. They connect us to centuries of textile craftsmanship while enabling modern construction techniques. From medieval artisans conserving precious wool to today’s computerized cutting systems, the principles remain constant: adequate allowances ensure strong, adjustable, and professional-looking seams.
Key Takeaways
- Historical Understanding Informs Modern Practice: Knowing why certain allowance widths developed helps modern sewers make informed decisions. The 5/8-inch standard exists for good reasons, but understanding alternatives empowers better choices.
- Fabric Drives Decisions: Different materials require different approaches. Lightweight fabrics benefit from narrower allowances, while heavy materials need wider margins for stability and proper pressing.
- International Awareness Prevents Problems: Understanding whether patterns include seam allowances prevents cutting errors. European patterns often require adding allowances, while American patterns typically include them.
- Tools Enable Precision: Modern seam guides, specialized feet, and accurate measuring tools transform seam allowance accuracy. Investment in proper tools pays dividends in consistent results.
- Testing Prevents Disasters: Always test seam allowance techniques on fabric scraps. This simple step reveals potential problems before they affect finished garments.
Professional Recommendations
For beginners, start with standard 5/8-inch allowances on stable, medium-weight fabrics. Master basic techniques before attempting specialized seam types or challenging materials. As skills develop, experiment with different allowance widths and finishing methods.
Intermediate sewers should focus on fabric-appropriate allowance selection and proper finishing techniques. Understanding when to grade, clip, or adjust allowances elevates work quality significantly.
Advanced sewers can explore historical techniques, international methods, and specialized applications. Teaching these skills to others helps preserve textile knowledge for future generations.
The journey from simple straight seams to complex couture techniques begins with understanding these fundamental margins. Whether learning to sew for the first time or refining professional skills, proper seam allowance knowledge forms the foundation of successful garment construction.
Remember that seam allowances serve multiple functions: they provide adjustment room, prevent fraying, enable proper pressing, and ensure long-term garment stability. Mastering these seemingly simple margins transforms sewing from mere construction into skilled craftsmanship that honors both historical tradition and modern innovation.